The Sony PCM 2300 DAT
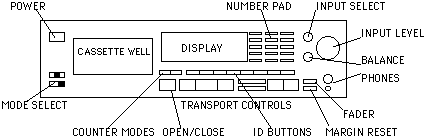
The Sony PCM 2300 looks much like a cassette deck, but has
a lot of extra buttons. The large ones tend to be the most important:
- POWER: Notice that you can't get a DAT out of the deck if
the power is off.
- OPEN/CLOSE: Press this to open the cassette well. The DAT
goes in with the window side up and the safety tab facing you.
You can push on the drawer to close it, but never attempt to
pry it open.
- INPUT SELECT: Chooses recording from the analog or digital
inputs. Also sets sampling rate in analog mode. (Digital rate
always matches source.) Always check the rec mode switch under
the power button. Use standard: long play sounds bad and few
decks can play it.
- INPUT LEVEL, BALANCE: Use these knobs to set analog recording
levels. Remember, you never want to hit zero on a digital deck.
The number above MARGIN in the display indicates how close to
zero you have come since inserting the tape or pressing the MARGIN
RESET button.
- FADER:
- If Playing, sound will fade out and tape will stop.
- If Paused, tape will start and sound will fade in.
- These work in Record also. If Stopped, pressing the REW or
FF will adjust the fade time.
- The time shows in the display.
The Transport Controls

- STOP
- PLAY: Note that you can press this at any time (except during
recording) and the deck will play as soon as it can. If the deck
is loading the DAT or has been idle for several minutes, there
may be a slight delay.
- PAUSE: This isn't really any different from stop unless you
are recording. Pressing PLAY or PAUSE will resume operation.
- REW, FF: These move the tape quickly. If you were in Play,
sounds will be heard, and it will resume playing when you lift
your finger.
- Previous: Press once to restart the current cut (as long
as start IDs are in place, see below). Press several times to
find earlier cuts. A number lights up under AMS (Auto Music Search)
to indicate how many times you have pressed.
- Next: Press once or several times to find later cuts.
- RECORD: When you press this, the deck goes into record and
PAUSE so you can set levels. Hit Pause or Play to begin recording.
- If you press Record when there is no cassette in the deck,
the unit enters AD-DA mode. Analog input is converted to digital
out and Digital input is converted to analog out. This permits
the deck to be used as a high quality converter for other digital
systems such as AudioMedia.
- RECORD MUTE: This only works if you are recording. The deck
records 5 seconds of silence and then pauses. This is the way
you should usually end recording.
The Number Pad
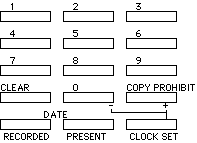
Numbers: Enter the number of the program you want to hear,
then press PLAY. Press Clear if you make a mistake. (See Start
IDs, below.)
Copy Prohibit: This will mark the recording as not copyable.
(See SCMS below) Not usually a good idea unless you are making
distribution copies.
Date: Press Present to see the current Date, Day of Week, and
Time. Press Recorded to see the Date, Day of Week, and Time the
cut being played was recorded. (But only if it was recorded on
a Sony machine.) Note 24 hour clock format.
The internal clock may be off a bit. To set clock, Press PRESENT
until the time shows, then CLOCK SET until the number you want
to set is blinking, then use the 0 and Copy Prohibit buttons to
change the numbers.
Counter:
The counter always shows minutes and seconds. If you press
the mode button, you get a choice of:
- Absolute time since the beginning of tape.
- Program time of this cut.
- Remaining Time on this tape (approximate).
- Time relative to where you pressed the RESET button.
More About Time:
Every inch of a DAT tape should have something recorded on
it. If you leave an unrecorded gap, the AMS and ID find features
will not work, nor will the time counter. The Sony PCM 2300 will
not let you fast forward into unrecorded space, but you can play
into it. If you want silent spots on the tape, record zeros; either
with the REC MUTE or by turning the input down. To find the end
of recorded space, simply hit FAST FORWARD. You will be left cued
up to the first blank. (Other decks have a special End Search
function to do this.)
Start IDs:

Start IDs are recordings in the subcode data of the tape. They
run for about 9 seconds (so they are easy to find in fast motion)
and contain a digital code indicating a start point.
If Auto is active, a start ID is recorded every time you hit
the RECORD button and signal starts. A new one will be added if
you Pause recording, or if the signal stops for a second or so
and restarts.
- Auto is always active when the deck is turned on.
- The Start ID is not triggered until the signal gets above
-40.
You can record a start ID anywhere you want one, even while
playing back.
- If you are recording, turn Auto off and press the Write button,
A start ID will be added at that spot.
- If you are playing, hitting the Write button will place the
deck in rehearsal mode. It will loop, starting where the ID will
be placed. Move the start point by tapping the Rew or FF buttons.
When the start point is correct, press the Write button again.
- You can remove a Start ID in playback by pressing the Erase
button above the words Start ID. The deck will rewind and zap
the previous Start ID.
Program Numbers
A program number is another chunk of data recorded in the subcode.
Most of the time the deck includes a program number with each
start ID, but not always. ( For instance, there will be no program
numbers when you add IDs during play.)
- You can set a program number while the deck is in Record
Pause. Simply type in the number wanted for the cut you are about
to record. The deck does not mind if the numbers are out of sequence
or duplicated. * I
- he Program Numbers on the tape are scrambled or missing,
the Renumber function will sort them out. Make sure Auto is on,
then Press Renumber. The deck will rewind to the beginning and
find each Start ID, correcting them as it goes.
- If auto is off, the Renumber function will also shift each
ID forward by about 0.3 seconds. (To move a single ID you must
erase it and then write it again.)
Skip IDs
Skip IDs instruct the deck to find the next start ID. You may
write them in Record or Play mode. If the deck is playing, it
goes into a rehearsal mode, looping to show you where playback
will stop. Adjust this point by hitting the Rew or FF buttons.
When the end of the loop is correct, hit Skip ID Write again.
- When you hit skip ID Erase, the deck rewinds to the previous
Skip ID and removes it.
- If you erase a Start ID that is marked with a Skip on top
of it, (Skips are shorter than Starts) the Skip is erased also.
End ID
An End ID marks that spot as the end of tape. The deck will
not play or fast forward past the End ID. An end ID is written
with the End ID Write button, the deck goes into rehearsal mode,
looping to show you where playback will stop. Adjust this point
by hitting the Rew or FF buttons. When the end of the loop is
correct, hit Write again.
To remove an End ID, fast forward till the display reads EE.
(If you play into an End ID, the deck goes into rewind.) Press
End ID Erase, and the End ID will be removed.
Things That Can Go Wrong with the 2300
SYMPTOM ~~~~ CAUSE
Function buttons don't work.
- The deck will not do anything for a few seconds after power
up
PLAY and FAST buttons don't work.
Cassette is rejected
- Cassette in backwards or upside down.
Fast Forward won't work
- At end of recorded part of tape.
Rewind and Fast Forward won't work
- There is a break in recorded data earlier on the tape.
Tape does not move
CAUTION indicator lights
Noises during rewind
- Probably normal operation.
REC and ID functions won't work
- Cassette record protect tab is open.
- A new ID cannot be placed within 9 seconds of an old one.
Can't record
- Level down
- Digital input selected
- At end of tape.
Suddenly starts fast forward
Very slow searching
Search does not find ID
- Only partial ID written.
- IDs too close together.
- Program numbers out of order.
Back to Equipment Page