Silence is golden, or at least pretty expensive. Commercial recording studios cost hundreds of thousands of dollars to build because they must allow absolutely no sound to enter from a usually noisy urban environment. Double and triple walls, isolated concrete slabs, custom steel doors are all standard but high priced items used in their construction. A studio's sound is its number one asset and most owners will go to any lengths to get it right.
Luckily, electronic music does not normally require the extreme isolation needed for recording live ensembles. The use of microphones is infrequent enough that it can be scheduled for predictably quiet times, and close mic techniques, (which are usually appropriate for sampling or vocal lines) don't pick up much noise. Given a reasonably quiet, solidly built house to start with, a decent home studio can be created with modest expense and effort.
Sound can travel through any medium-- in fact it passes through solids better than through air. Sound intensity is reduced in the transition from one material to another, as from the air to a wall and back. The amount of reduction (called the transmission loss) is related to the density of the wall-- as long as it doesn't move in response to the sound. Unfortunately, all walls are somewhat flexible. Any motion caused by sound striking one side of the wall will result in sound radiated by the other side, an effect called coupling. If the sound hits a resonant frequency, the wall will boom like a drum. Most isolation techniques are really ways to reduce coupling and prevent resonances.
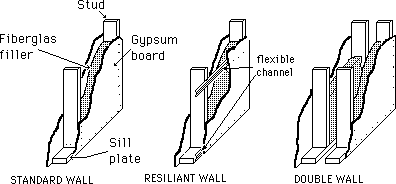
The most effective soundproofing must be designed into a house when it is first built. A typical residential wall is made of a frame of 2x4 wood studs covered with 5/8" thick gypsum board. Properly built (no holes!) this will provide about 35 dB of isolation. Fiberglas filler, R-7 or better, will increase this by 5 to 8 dB and decrease wall resonance. Doubling the thickness of gypsum gives another 3 to 6 dB of overall isolation, but its most important effect is lowering the resonant frequency, hopefully below the audio range.
There are two common strategies for reducing coupling between the two sides of the wall. One is to make the gypsum to stud connection springy, either by using metal studs or by hanging the gypboard on resiliant metal bars. The most effective trick is to use separate studs for each face of the wall so there is no direct connection. This eats up a lot of space, but can give a transmission loss of over 60 dB. This is actually better performance than simple cinder block or poured concrete construction!
Fig. 1 Construction Details
These same principles can be applied to floors and ceilings. A heavy false ceiling hung on springs can match the performance of a double wall-- If there is a room below the studio, it should get a double ceiling too.
The window between control room and studio used to be a traditional feature of a recording facility. The home studio doesn't really need one, because you can get a decent video camera and a large monitor for less than what a good window costs to build. If you want a window, figure 2 shows what has to be done:
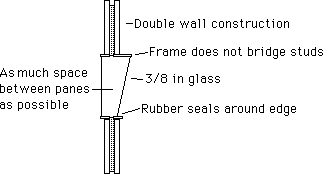
Figure 2. The traditional window.
The effectiveness of these kinds of construction depends a great deal on the craftsmanship of the builder. There must be no loose studs, and the sill plates must really hug the floor. The gypboard must be well fitted and all potential cracks must be caulked. (Caulk is soft and will not crack when the building settles.) Do not put holes in sound walls for outlets or pipes-- use surface mount electrical fittings and caulk around any wires that pierce the gypboard.
The peskiest isolation hassle is dealing with sounds transmitted through the frame of the building. The problem is caused by machinery such as air conditioners and refrigerators which are mounted on floors or walls and can actually shake the structure. Footsteps can cause similar effects to a somewhat lesser extent. This is usually not severe with wood frame construction but can be a nightmare in a concrete and steel building.
This kind of noise must be treated at the source. Walking areas should be carpeted, and heavy appliances have to be mounted with shock absorbers or placed on thick rubber pads. In a wooden house sound tends to be transmitted along the floor joists, so some problems can be solved by simply moving the offending machines. With concrete and steel buildings, you usually wind up completely "floating" the studio floor, a very complex and expensive operation.
Water pipes are distressingly efficient at carrying sound. If any pass under the floor of the studio (pipes in the walls are a definite no-no) make sure they are on flexible hangers. If your pipes are prone to "water hammers" consult a plumber about possible cures.
We seldom have the luxury of building our home studio from scratch. More often we are trying to fix up an existing room, and budget or landlords limit the techniques we can use. The best approach to adding soundproofing is to try simple techniques first and to move to the high caliber options only when needed.
You can reduce the amount of isolation you need if you give some careful thought to the choice of rooms you are putting your studio in. Pick a room that does not adjoin a kitchen or bathroom, or the place where your housemate does taxes or watches TV. In other words, put some space between the studio and the noisemakers or sound sensitive activities. The fewer walls in common with the rest of the building, the better. Clearly, a house is a better location than an apartment because you don't have to worry as much about sound traveling through the ceiling or floor. An outside corner room away from the street would be a good choice, a basement would be even better.
Some people consider a garage the ideal location for a studio. This may be true, but you will encounter special problems with the big door and with getting heat and ventilation. The way most garages are built, you are really working outdoors.
Most builders are more concerned with how walls look rather than how solid they really are. This is unfortunate, because any air path from one room to another will limit the wall's effectivness. You can make an amazing contribution to keeping the sound in your studio by filling all cracks and holes, no matter how small or indirect.
The worst sound leaks will be around doors. Your neighborhood hardware store has the fittings and gaskets to fill these up, sold for weatherstripping but effective for sound too. Some common styles of gasket are illustrated in fig.3.
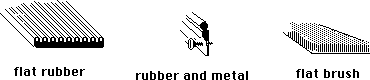
Fig. 3 Gaskets
The flat rubber type is used in a door that doesn't fit well, rubber and metal gaskets work on doors that are pretty tight already. The brush material is for sliding surfaces. Don't forget the bottom of the door-- the best gaskets are spring loaded and drop down when the door is closed.
Once the door is sealed there still may be leaks around the door frame. Carefully remove the trim and fill any gap between the frame and gypsum board with caulk or spray polystyrene foam. As long as you are pulling off trim, check for gaps behind the baseboards and around any window frames.
Incidentally, many interior doors are hollow and light and don't really stop sound well even when tightly gasketed. Such a door should be replaced with a solid one. Manufacturers will supply data on the amount of transmission loss a door can provide. Alternatively, the door can be reinforced with a layer of thick plywood, or you may want to hang a second door that opens the other way in the frame. If none of this is practical, a really heavy curtain over the door will help some.
External windows are a real problem, since a single layer of ordinary glass is only slightly better sound insulation than nothing at all. Storm windows are a big help, especially if you fill the space between panes with fiberglas. (You don't really need to see outside, do you?) Thermal glass is actually worse than a single pane window because the narrow air space tends to resonate. Seal the movable part of the window with good gaskets, then cover the whole opening with heavy drapes. Make sure the drapes fit snugly against the wall all the way around. An inexpensive alternative to drapes is a solid piece of 3/4" plywood, gasketed just like a door. This can be hinged to the wall as shutters or in a sliding track, just as long as it fits tightly.
Electrical fittings are another source of leakage. Take the plates off light switches and receptacles, fill the gaps between the box and the gypboard, and add a sealing gasket when you put the plate back on. If switches or receptacles are found back to back in both sides of the wall, the gasket will not be enough to stop sound. Replace the electrical box with a surface mount type, and patch over the original hole. If you aren't up for rewiring, cover the offending outlets with a weatherproof hinged cover.
Air ducts present a special problem. You don't want to cover them up (even keyboard players have to breathe), but they are a veritable freeway for sound. To soundproof air vents build a baffle as illustrated in figure 4. Start with a rectangule of 3/8 in plywood as large as you can fit into the space. Cut a series of slots for the air to pass through, and cover the back with fiberglas, leaving the slots clear. Hang this at an angle in front of the duct and fit triangular pieces over the ends.
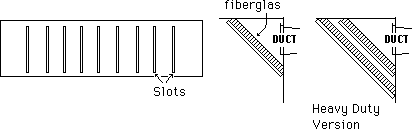
Fig. 4 vent baffles
Put one of these on each vent connected to the studio ducts, even those in other rooms. If this isn't enough, you can add a second unit in front of the first.
As I mentioned earlier, low frequency sound can actually resonate a gypsum board wall just as it will rattle a drum head. When this happens, the bass might seem louder in the next room than it is in the studio! The only cure short of tearing the wall down and rebuilding is to add weight, usually another layer of gypboard. This is most effective if the new gypboard is thicker than the original and if it is glued in place rather than nailed to the studs.
There is no point in doing this halfway-- you must cover all internal walls, preferably on both sides. Additional gypsum gives diminishing returns, but an intermediate layer of soft fiber board can be helpful.
Even if there is no direct air route for sound to follow, there can be flanking paths around heavy walls through thin ceilings or floors. The sound will then pass through the attic or crawl space into adjoining areas.
You can add gypboard to a ceiling either directly on top of the existing material or suspended a few inches below. In some cases it would be simpler to extend the side walls all the way up to the roof. A properly built hardwood floor should not leak much sound, but sometimes contractors cut corners when a house has wall to wall carpet-- you should lift a corner of the carpet and see what is really below.
Truly isolated spaces are created by building a separate room within the room. Both the external room and the internal room have to be tight and heavy and there must be no solid connection between the two, not even the floor. You can buy prefrabricated isolation rooms (at a hefty cost), or you can build one using construction techniques similar to that of the house. Something like this should really be designed by an architect to fit your situation, but here is a typical plan to give you the idea.
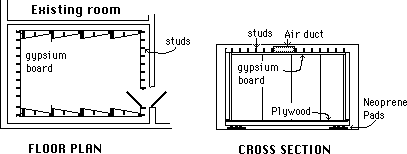
Fig 5 Plans for a room within a room.
The inner room is built on a platform of 2X4s covered with two layers of 3/4 inch plywood. The platform is supported by neoprene pads that line up with the floor joists. There must be no other connection between the room and the house. The walls and ceiling are built on the platform using 2X4 studs and double gypboard on the inside only. The space between the walls should be at least one inch (wider if practical) and lined with fiberglas. The air duct should be very long and lined with sound absorptant material. Get the heaviest solid door and frame you can find, and add gaskets as described above.
These steps can result in a very quiet space, but they get progressively more expensive-- the real question is when is it quiet enough? The easy test is to make a recording of the space. No sound, just a tape of the mic levels at their usual setting with nothing going on. Now turn up the gain and play it back. If you can't hear any difference between the unrecorded and recorded portions of the tape you have reached your goal.
The only way to get an objective measurement of sound levels is to use an SPL meter. (There are some inexpensive models by Gold Line/loft or Radio Shack.) As measured by the "C" scale on these meters you will find the following numbers appropriate for these uses.
A decent home studio should measure in the 20s. Assuming all noise sources are outside the room, you can calculate the amount of transmission loss the walls have to provide by measuring the sound level with the door open. Close the door and you can figure what you already have. If the level does not change when you close the door, you know where to start!
Has this ever happened to you? You are playing your latest masterpiece at a party at a friend's place, and when the best song comes on you want to hide under the couch-- the bass is boomy, the highs screech, and along with the backup vocals you can definitely hear Gilligan's Island. If you find this experience familiar, you are probably the victim of BAD ACOUSTICS.
You won't be surprised to hear that the shape and furnishings of a room can affect the way things sound-- we have all experienced extreme cases such as large echoey bathrooms and overstuffed restaurants. These effects can easily happen in a subtle way in your studio, causing inaccuracies in the sound from the monitors. When you record or mix you adjust the music till it is right in your control room, but when you play the tape in a neutral environment the sound is overcompensated and strange.
There are expensive instruments available to measure the quality of sound in a space, but the best ones are on the sides of your head. You can compare rooms by listening to familiar recordings. (It doesn't have to be on CD-- you can tell a lot from the quality of hiss on a tape.) In a good room, the bass is balanced and clear, cymbals "shine" without being harsh, you can understand words without effort. A mono signal appears to come from a spot exactly between the speakers, and that spot does not jump around with changes of pitch. Now listen to the quiet-- can you hear a refrigerator, a TV, traffic on the street? Clap your hands--you should hear a slight broadening of the sound, but little reverberation and certainly no pitches or echoes.
These simple tests should tell you about any severe problems the room may have. Subtle ones will show up in the music produced in the room, as described above. You may be surprised to find that the control of the sound of a room is not really very complicated and can usually be accomplished with inexpensive materials.
The goal is very simple-- we want to get the sound from the speakers to your ears without messing it up. This is really just a matter of what becomes of the sound after it passes your ears.
There are three things that can happen when sound hits a wall. It can be reflected, absorbed, or diffused. If the wall is flat and hard, the sound will be reflected. A single strong reflection can sometimes be heard as an echo, but in most rooms a lot of reflections (including reflections of reflections) combine into the reverberation. The aspect of reverberation you hear about the most is reverberation time. This is the amount of time it takes a loud short sound to die away. "Dying away" can be defined more scientifically as a drop in loudness of 60 dB, so acousticians call reverberation time RT60.
The amount of reverberation desired in a room depends on the activity going on. Musicians like fairly long reverberation times; between one and two seconds. This allows them to hear themselves play and enhances the harmonic effects of the music. (In larger rooms even more reverb is desirable because it helps fill the hall with sound.) For listening to speech or music played through loudspeakers this amount of reverb is too much-- values around a second are more comfortable, and for critical listening to speakers the RT60 should be close to a half second.
Reverberation time is determined by the volume of the room. It can be reduced by replacing some of the hard, reflective parts of the the walls with soft, absorptive sections. Every material has some absorptive qualities. This is described by its coefficient of absorption, a number between 0 and 1, with 0 being totally reflective and 1 being an open window. For instance the COE of brick is 0.04, whereas that for heavy drapes is around 0.6. The effective absorption of a surface is simply the COE times the area of the surface in square feet. These numbers can be used to compare materials and to predict the results of treatment. The absorption ability of most materials is frequency dependent, which can cause problems as described later.
Reflections off flat walls can sometimes combine to produce undesirable effects. The worst of these is the standing wave.
Standing waves are created when you have two parallel facing walls. There will be a particular set of frequencies that are reinforced by the distance between the walls (the sound makes exactly one round trip on each cycle of the speaker and the pressure fronts pile up). This is what happens in bathrooms- you probably know one where the deep tones of your voice are tremendously supported (doesn't everybody sing in the shower?). Most rooms have three pairs of parallel surfaces, and the dimensions are usually just right to affect music. An eight foot ceiling, for instance, reinforces 70 hz. ( This is called a room mode.)
This phenomenon can be prevented by designing the room with nonparallel walls. It can be cured in existing rooms by making one of the walls absorptive or by breaking up the flat surfaces. When sound is reflected off a rounded or complex surface, it is diffused. Diffusion spreads the reverberant sound evenly throughout a room, which not only prevents standing waves but also eliminates "dead spots"-- places where components of the sound are missing.
We can break up flat surfaces by hanging large objects called diffusers. The shapes chosen for diffusers are really a matter of taste and cost. Avoid concave curves, which focus sound instead of dispersing it, but otherwise pyramids, lattices, or computer designed random surfaces all work well. The depth of a diffuser determines the lowest frequency that will be affected. A diffuser one foot deep will scatter sound down to 160 hz.

Fig 6. Some popular shapes for diffusers.
Reflections can cause a further problem when the principal activity in a room is listening to loudspeakers.
You may be familiar with phase interference from recording work with multiple microphones. If a sound arrives at a single point via two paths at slightly different times, certain frequencies will be reinforced and others will be weakened. You can easily hear this by putting your ear close to a wall: the quality of sound will change because the reflections off the wall interfere with the direct sound. The effect is at its worst when the distance the reflected sound travels is only slightly longer than the direct distance.
Phase interference is attacked by careful consideration of the placement of speakers and the listener. In general avoid locating either so that there are short reflective paths off of walls, ceiling, or equipment. The worst problems occur when a speaker winds up in a corner. If this is unavoidable, figure out where the reflections occur, and make that part of the wall or ceiling absorptive.
What I've said so far might seem to imply you can take care of all acoustic problems by making every surface absorptive, completely deadening the room. Actually, such a room is rather unpleasant to work in, but even if it weren't, any attempt to create it would probably be a disaster. The problem is that all absorptive materials are frequency selective. As a general rule, high frequency sound is absorbed more readily than low, so as absorption is added to a room, the reverberation becomes more and more bassy in tone. Some of this coloration is ok, even preferable, but eventually the room develops a tubby response. If we need a very dead room and bass buildup occurs there are devices called bass traps and Helmholtz resonators that absorb a restricted range of very low frequencies. The specifics for designing these are beyond the scope of this article, but the general principle is the larger they are, the lower the frequency. The moral is that absorption should be used only in moderation, and only materials that soak up the full range of sound should be used.
Such materials need not be expensive. In fact, ordinary R-19 fiberglass insulation (about 6 inches thick ) is as good a general purpose absorber as you can find and costs about 30 cents a square foot. You can tack it right to the wall, paper side down. Of course this is ugly as sin and breathing fiberglass is not good for you, so you want to cover it up with some lightweight cloth. More attractive absorbers can be made from Insul-shield (a solid wall insulation material) or various foam products sold through audio supply houses. (Again see sidebar) These all work down to 100 hz or so. Carpet on a thick pad is a decent absorber down to about 250hz. It is the simplest way to control floor to ceiling standing waves, and if hung in deep pleats works well as a wall treatment also.
We can get away with materials that poop out below 100 hz because normal wall and floor construction is absorptive in the low end but very reflective above 200 hz. This means that the reverb in an empty room is almost always bass shy.
These facts suggest a fairly simple recipe for tuning a room: Add absorption until you reach the point where the new material balances the original curve of the room, yielding a reverberation with a nice flat frequency response. Place the first panels near the speakers where they will eliminate interference paths, then spread the rest through the room to cut out any standing waves. If you are left with parallel hard surfaces, put diffusers on them. This method does not allow direct control of the reverberation time, but for any room smaller than 2000 cubic feet the RT60 should fall into the usable range.
As an example of how to apply these principles, let us look at an ordinary room in a typical house. (All right, it's my wife's studio in my house!) This room is rectangular, about 11' by 13' with an eight foot ceiling. There is a large closet at the back of the room and a window at the front looking onto a suburban street. The closet helps isolation because it provides something of a double wall between the studio and the living room.
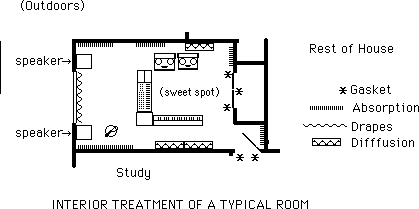
Fig. 7 A treated room.
There was a plush carpet over a thick pad on the floor, but no other absorptive material in the room to start with. The clap test in the empty room suggested a moderately long, primarily high frequency reverberation and produced the characteristic "chirp" of a severe standing wave problem.
After adding gaskets to the doors, isolation from the rest of the house is adequate as long as recording is limited to quiet times. (We checked this out before we moved in!) Noise from the street is an occasional problem which was helped a little by drapes on the window. An additional drape across the doorway made only a slight improvement in isolation and was really in the way, so we gave it up.
After some experimentation, we decided to locate the speakers each side of the window. Since speakers tend to move gypsum as well as air, outside walls are always your first choice if you are concerned with sound control. Incidentally, these are obviously not near field speakers. Near field monitors should not be against a wall, but most large systems depend on a wall backing for extended bass response. The speakers were hung about 6 ft from the floor. This is a bit on the high side, but was necessary to allow the placement of a writing table underneath them.
The speakers wound up eight feet apart. This placed the "sweet spot" eight feet from the wall along the center line of the room. This in turn dictated the location of the mixing board and other equipment. Once the equipment was set in place, we checked for reflective phase interference from the console or cabinet tops. This can be tested with a mirror and a flashlight. Set the mirror on the console and hold the flashlight by your ear aimed at the mirror. If the light beam falls on or near the speakers there is a potential reflection problem. This can usually be fixed by propping up the back of the board.
At this point we were down to two problems: the rising frequency response of the reverberation and the standing wave. We attacked both problems at the same time with some carefully placed absorptive panels. These were made of R-19 fiberglass and measured 2 ft by 6 ft. (They do not need to extend down to the floor because the furniture scatters sound at that level.) Most of this absorption wound up on the walls near the speakers-- this cleaned up the last of the short delay reflections and resulted in a very clear sound image between the speakers. The absorption was brought along the side walls to soak up the standing wave. We wanted to keep the room symmetrical, so we spaced out the absorptive panels, winding up with a pattern where bare wall on one side was opposed by absorption on the other. A large section of absorptive wall near the left speaker created a dead corner for recording vocals.
The curtain over the window Is too light to be a really broadband absorber, but it combines with the low frequency absorption of the glass to give a reasonably flat overall effect. The carpet and wooden floor interact in much the same way.
We found the sound to be balanced in frequency when the walls were about one third covered with fiberglass. This left the side walls near the back of the room untreated so we added diffusion. This is provided by some homemade diffuser panels on one side and some very cluttered bookshelves on the other.
This particular project cost about $30, and I must say I am quite pleased with the results. Gilligan stays in the bedroom down the hall, and quiet activity in adjoining sections of the house causes no problems with close mic recordings. A mono signal fed to both speakers appears to be centered precisely between them, and any imbalance in a stereo signal is immediately obvious. The room has a soft, comfortable ambience and the music produced there sounds just fine out in the real world.
There is a lot more to acoustics than the principles explained here, but these techniques are the most likely to be effective in an existing small room with a limited budget. If you are planning a new building or just want to study more you can find some excellent articles in Handbook for Sound Engineers; edited by glen Ballou, and Sound Studio Construction on a Budget by F. Alton Everest.
Petr Elsea 1996